> For the complete documentation index, see [llms.txt](https://docs.flora.ai/llms.txt). Markdown versions of documentation pages are available by appending `.md` to page URLs; this page is available as [Markdown](https://docs.flora.ai/nodes/3d-node.md).

# 3D Node

Generate or import 3D models, then stage and capture them for your workflow

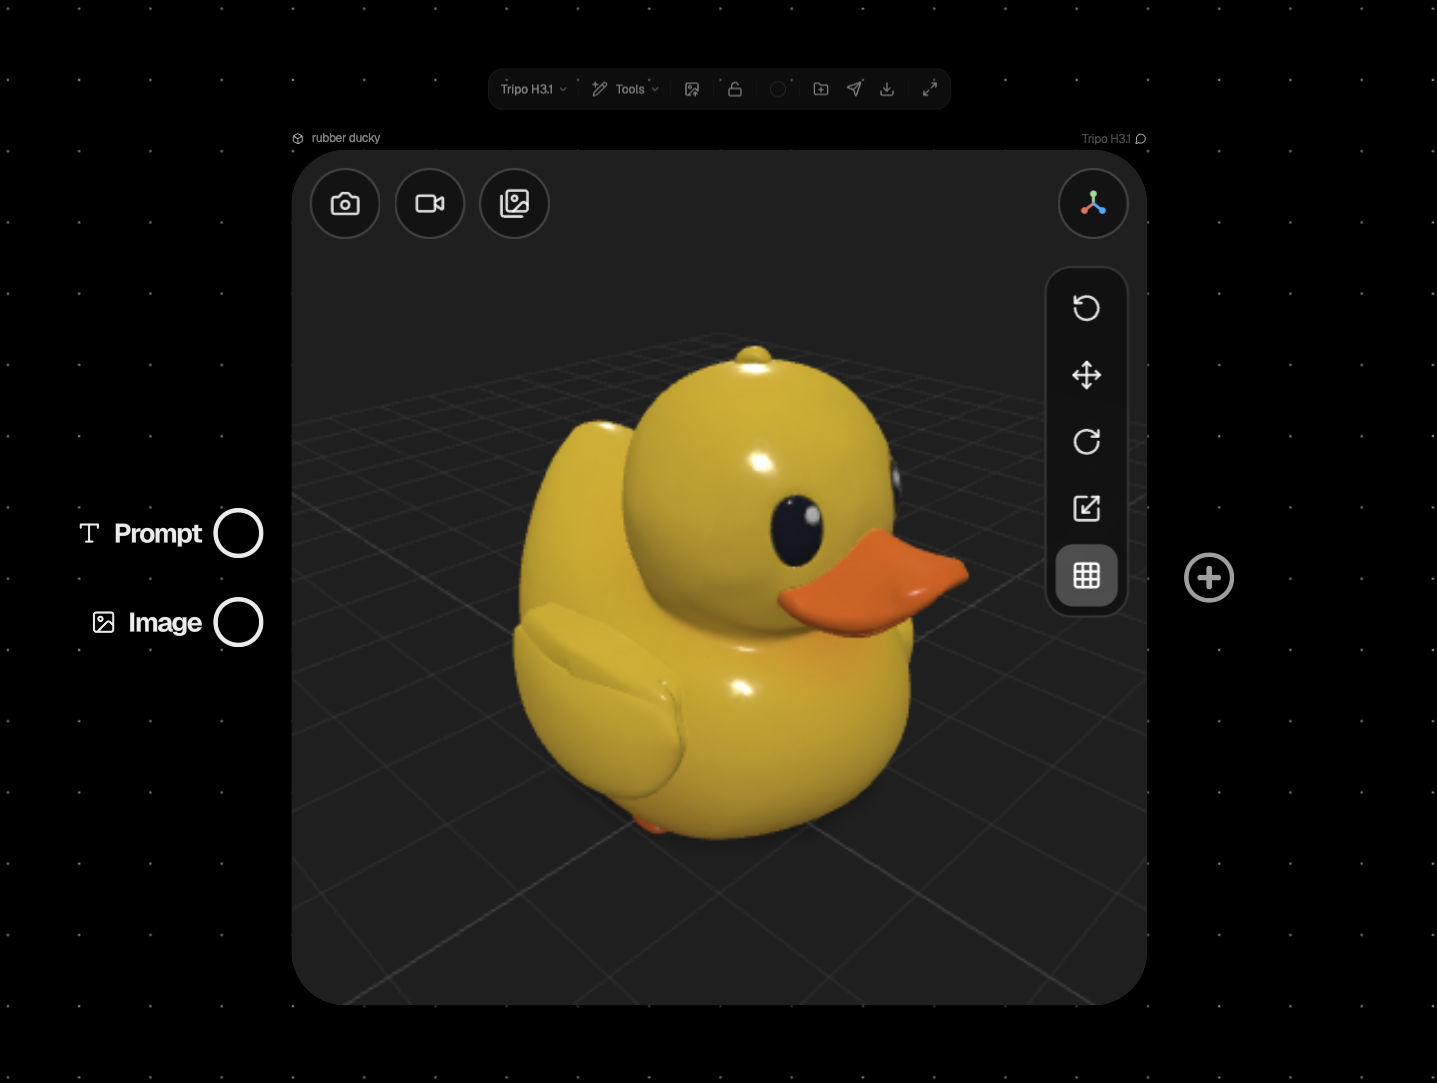
The 3D Node brings real, textured 3D assets onto the FLORA canvas. Generate a model from a text prompt, a reference image, or several reference views, import your own GLB file, then orbit, stage, and capture it in a live viewer—turning a single 3D asset into stills, turntables, and video that feed the rest of your workflow.

## Overview

* **Generate from text or an image** — describe what you want, or ground the model in a reference image, using one of several 3D generation models
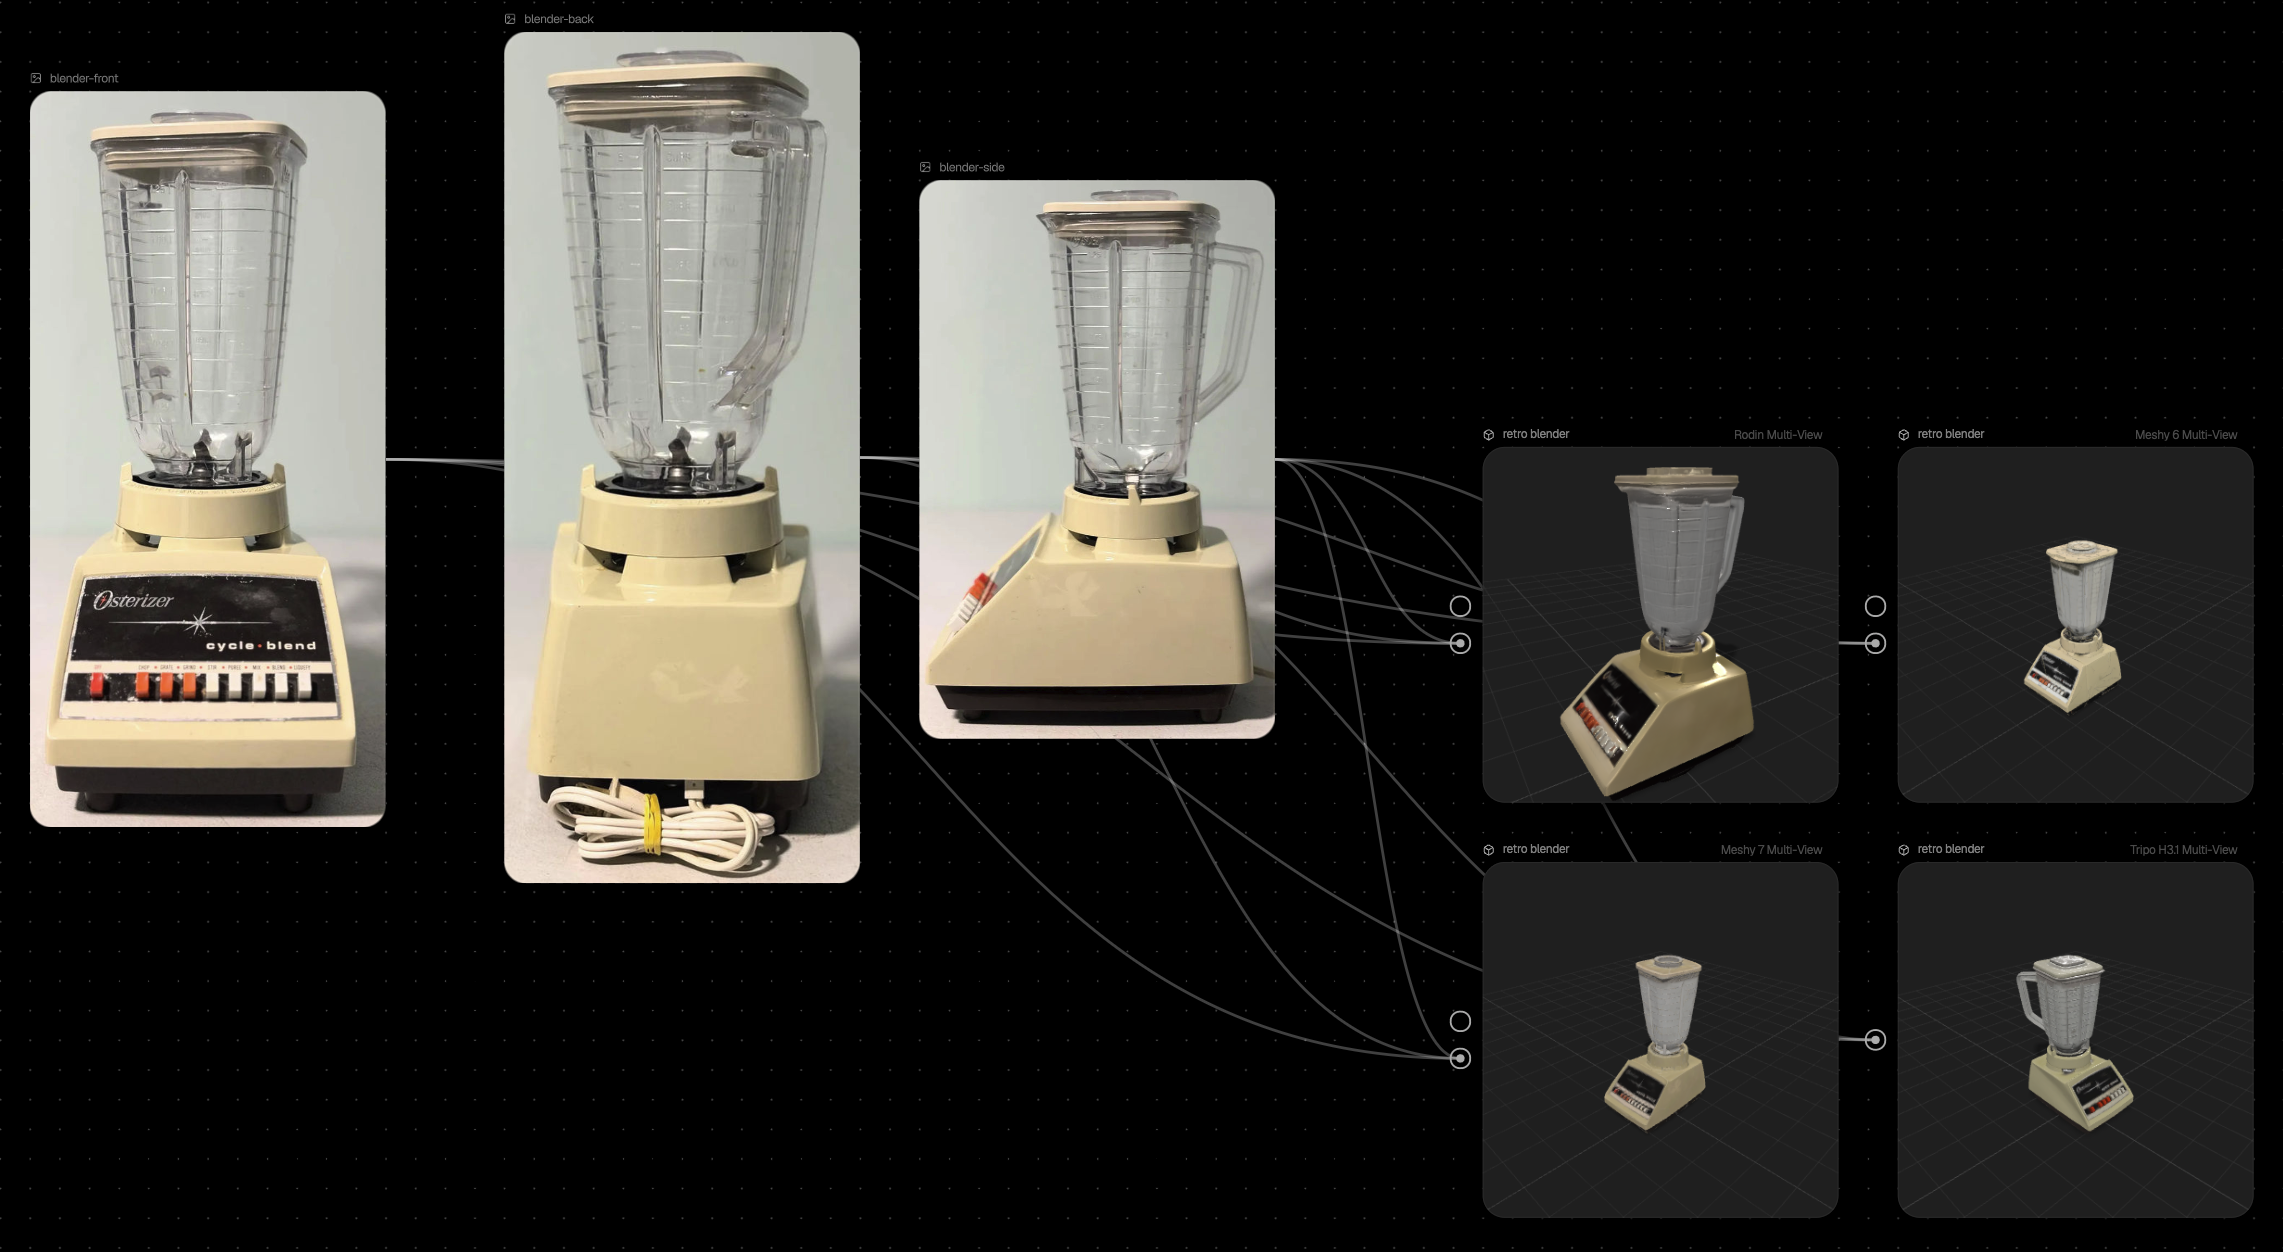
* **Reconstruct from multiple views** — feed in two to four photos of the same object for a more accurate multi-view reconstruction
* **Import your own GLB** — drag and drop an existing textured model onto the canvas
* **Orbit, stage, and light** — the built-in viewer supports orbit/zoom/fly navigation, move/rotate/scale gizmos, a ground plane toggle, and automatic studio lighting with soft shadows
* **Capture to 2D** — turn your staged 3D scene into a photo, a video recording, or an 8-view turntable sheet, each landing on the canvas as ordinary image or video nodes
* **Download in multiple formats** — export as GLB, OBJ, STL, PLY, or USDZ, converted right in your browser

***

## Getting Started

### Adding a 3D Node

{% stepper %}
{% step %}
**Add the Node**

Press **3** on the canvas, or open the add-node menu and choose **3D**.
{% endstep %}

{% step %}
**Pick a Model**

Choose a 3D model from the model picker in the node's header. The node's input handles update automatically to match what that model accepts—a prompt, an image, or both.
{% endstep %}

{% step %}
**Provide Inputs**

Type a prompt directly into the node (or connect a text node), and/or connect an image node to the image input.
{% endstep %}

{% step %}
**Run**

Click **Run**. Generation typically takes around 5 minutes—hover the Run button beforehand to see the estimated credit cost.
{% endstep %}
{% endstepper %}

<figure><img src="https://526296967-files.gitbook.io/~/files/v0/b/gitbook-x-prod.appspot.com/o/spaces%2FWthH0GpcCHwVdtbvahZS%2Fuploads%2Fgit-blob-029030e3ee9751088950b58f664ef1b82b700e8a%2F3D-Node.png?alt=media" alt=""><figcaption></figcaption></figure>

***

## Generating a Model

### From a Text Prompt

Type a description directly into the node, or connect a text node to its prompt input. Not every model supports text-only generation—check the capability table below.

### From a Reference Image

Connect an image node (or upload a file) to the node's image input. The selected model generates a 3D reconstruction grounded in that image.

### From Multiple Views (Multi-View)

For higher-fidelity reconstructions, connect two to four images of the same object—shot from different angles—into the node's image input, then select a **Multi-View** model from the picker (for example, **Tripo H3.1 Multi-View**).

<figure><img src="https://526296967-files.gitbook.io/~/files/v0/b/gitbook-x-prod.appspot.com/o/spaces%2FWthH0GpcCHwVdtbvahZS%2Fuploads%2Fgit-blob-66b4beca9112c612b49ca433fea3aac50134fa2f%2Fmulti-view-3D-generation.png?alt=media" alt=""><figcaption></figcaption></figure>

{% hint style="info" %}
Multi-view mode isn't selected automatically—connecting several images to a non-multi-view model just uses one of them. Pick the **Multi-View** variant of your chosen model from the picker yourself. Connect too few or too many images and the Run button tells you what's missing (e.g. "Connect at least 2 images").
{% endhint %}

***

## Models

The table below lists the 3D models currently available in FLORA. The model picker on the node always shows the live list.

<table><thead><tr><th width="160">Model</th><th width="100">Provider</th><th>Description</th><th width="90" align="center">Image Input</th><th width="90" align="center">Text Input</th><th width="90" align="center">Multi-View</th></tr></thead><tbody><tr><td><strong>Hunyuan3D v3.1 Rapid</strong></td><td>Tencent</td><td>Detailed, textured 3D assets from text or a reference image, with low-poly and geometry-only modes.</td><td align="center">✅</td><td align="center">✅</td><td align="center">❌</td></tr><tr><td><strong>Hi3D v3.0</strong></td><td>Hitem3D</td><td>High-resolution textured assets from a single image, with Quality and Master detail tiers. Pick the Multi-View variant for 2–4 angles.</td><td align="center">✅</td><td align="center">❌</td><td align="center">✅</td></tr><tr><td><strong>Meshy 5 Remesh</strong></td><td>Meshy</td><td>Retopologize an existing 3D asset.</td><td align="center">❌</td><td align="center">❌</td><td align="center">❌</td></tr><tr><td><strong>Meshy 5 Retexture</strong></td><td>Meshy</td><td>Apply a new texture to an existing 3D asset.</td><td align="center">❌</td><td align="center">❌</td><td align="center">❌</td></tr><tr><td><strong>Meshy 6</strong></td><td>Meshy</td><td>Production-ready textured assets from text or an image, with pose and topology controls. Pick the Multi-View variant for 2–4 angles.</td><td align="center">✅</td><td align="center">✅</td><td align="center">✅</td></tr><tr><td><strong>Meshy 7</strong></td><td>Meshy</td><td>Higher-fidelity textured assets from a reference image, with pose, topology, and optional rigging. Pick the Multi-View variant for 2–4 angles.</td><td align="center">✅</td><td align="center">❌</td><td align="center">✅</td></tr><tr><td><strong>Rodin v2.5</strong></td><td>Hyper3D</td><td>Production-ready assets from text or a reference image, with PBR or shaded materials. Pick the Multi-View variant for 2–4 angles.</td><td align="center">✅</td><td align="center">✅</td><td align="center">✅</td></tr><tr><td><strong>SAM 3D</strong></td><td>Meta</td><td>Fast 3D reconstruction from a single image, powered by Meta's Segment Anything.</td><td align="center">✅</td><td align="center">❌</td><td align="center">❌</td></tr><tr><td><strong>Trellis</strong></td><td>Microsoft</td><td>Textured 3D asset from one reference image.</td><td align="center">✅</td><td align="center">❌</td><td align="center">❌</td></tr><tr><td><strong>Trellis 2</strong></td><td>Microsoft</td><td>Higher-detail textured 3D asset from one reference image.</td><td align="center">✅</td><td align="center">❌</td><td align="center">❌</td></tr><tr><td><strong>Tripo H3.1</strong></td><td>Tripo3D</td><td>Fast, textured PBR assets from text or a reference image, with fine-grained quality controls. Pick the Multi-View variant for 2–4 angles.</td><td align="center">✅</td><td align="center">✅</td><td align="center">✅</td></tr></tbody></table>

***

## The 3D Viewer

Hover over or select a 3D Node and its still preview comes alive as an interactive viewer, right inside the node.

<figure><img src="https://526296967-files.gitbook.io/~/files/v0/b/gitbook-x-prod.appspot.com/o/spaces%2FWthH0GpcCHwVdtbvahZS%2Fuploads%2Fgit-blob-b4f69d611465ea58e4ca04b6f1bc5b16ac594a00%2Frotate-ducky-3D.gif?alt=media" alt=""><figcaption></figcaption></figure>

### Navigation

* **Orbit** — click and drag to rotate around the model
* **Zoom** — scroll to move closer or further away
* **Fly** — use **W / A / S / D** to move the camera through the scene

### Tools

The viewer's toolbar (in the node header, and directly in the viewport) gives you:

* **Reset view** — return to the original camera framing
* **Move / Rotate / Scale** — gizmos that reposition the model itself, not the camera
* **Ground plane** — show or hide the reference grid

A small axis icon in the top-right corner of the viewer shows or hides this toolbar. Studio-style lighting and a soft ground shadow are applied automatically—there's nothing to configure.

When you move your cursor away, the node freezes on your current camera angle and saves it as the node's preview image, so your framing survives reloads.

***

## Capturing to Images and Video

Three capture tools turn your staged 3D scene into ordinary FLORA nodes:

* **Photo** — capture a single still from the current angle. Creates one image node ("3D Capture").
* **Video** — record the viewport as you manually orbit, fly, or turntable the model. Creates a video node ("3D Recording").
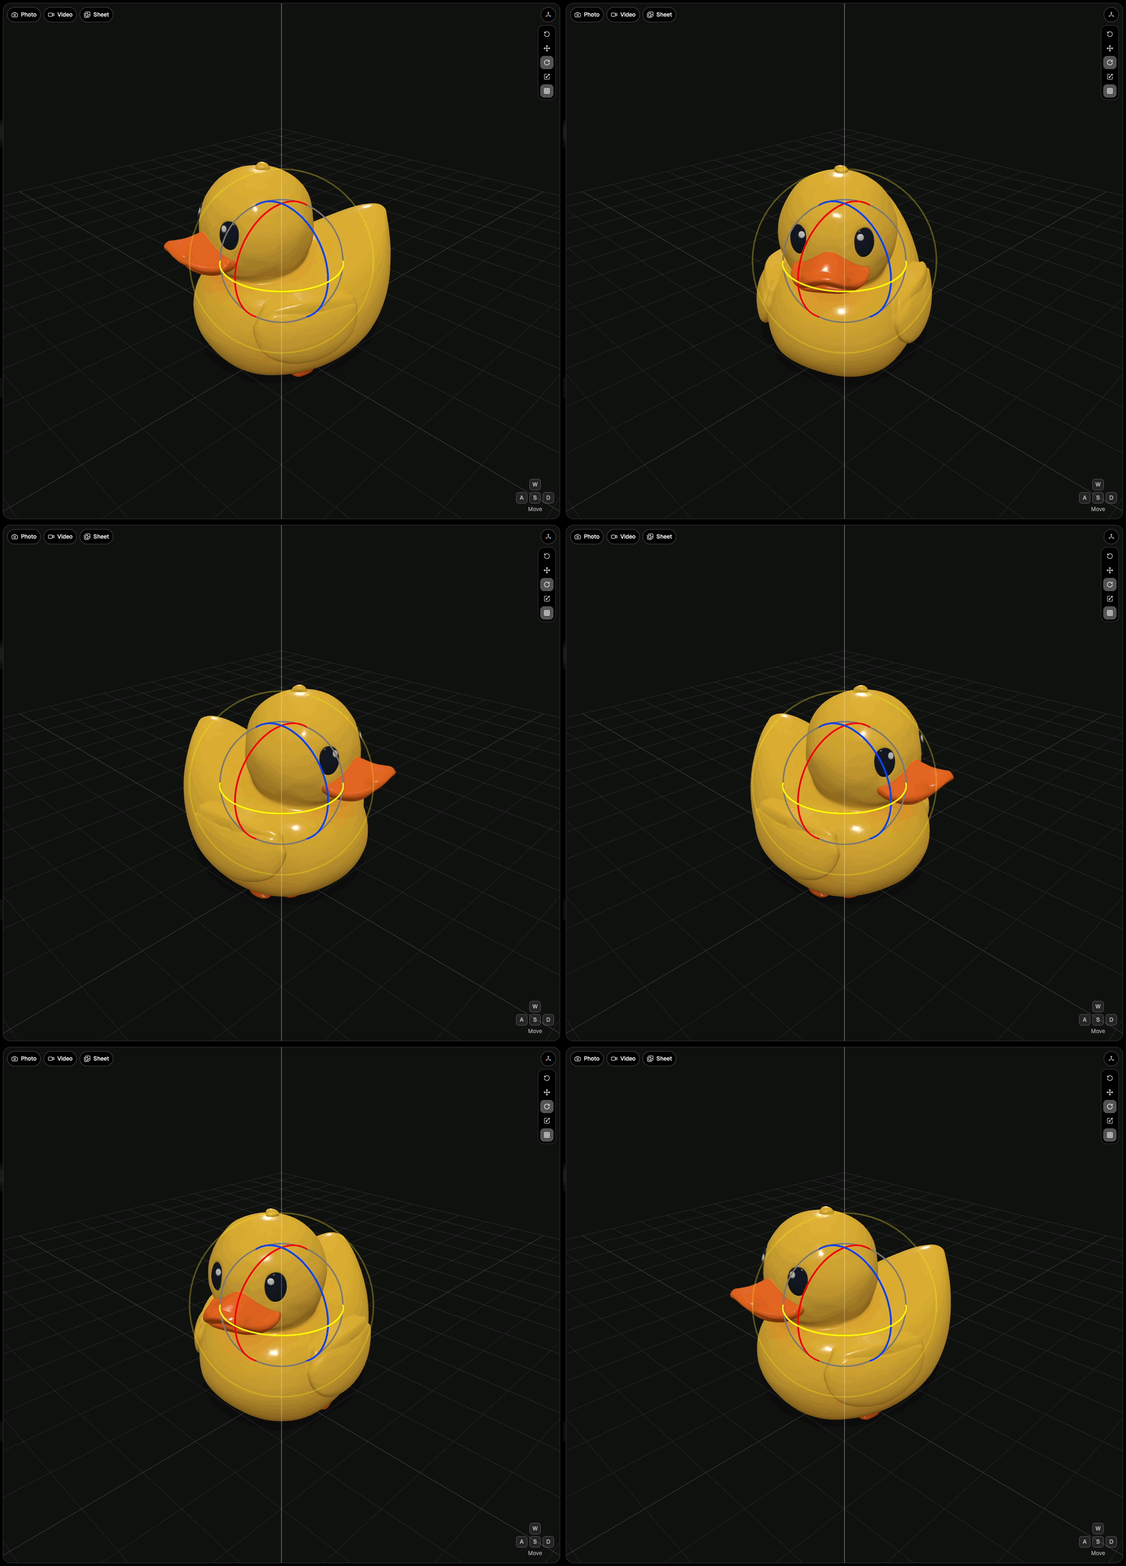
* **Sheet** — automatically rotate the model 360° and capture 8 evenly-spaced views. Creates eight image nodes ("3D View 1/8" through "3D View 8/8")—useful as a character or product turnaround reference for downstream generation.

Once captured, these are regular image and video nodes—connect them into any image, video, or text model like any other node output.

***

## Importing Your Own Models

Drag and drop a `.glb` file onto a 3D Node, or use **Import** in the node's toolbar.

* **Format** — GLB (glTF Binary, version 2.0) only. Export from other formats (OBJ, FBX, glTF) to GLB first.
* **Size** — up to 100 MB
* **Self-contained** — the GLB must embed its own textures and buffers; files that reference external resources are rejected

***

## Downloading and Exporting

Use **Download** in the node's toolbar to export in your preferred format—converted right in your browser, no server round-trip:

* **GLB** — the original file, unchanged
* **OBJ**
* **STL** — for 3D printing
* **PLY**
* **USDZ** — for AR viewers (e.g. iOS Quick Look)

Some formats carry less information than GLB—OBJ, for instance, doesn't preserve PBR materials—so download GLB when you need full fidelity.

***

## Saving and Sharing

* **Save to Assets** — save a 3D Node to your workspace Assets library and reuse it across projects
* **Copy and paste** — copying a 3D Node into another project clones its underlying asset automatically
* **Share** — visitors get a live, interactive viewer (orbit, zoom, pan) opened at your saved camera angle, and can download the GLB—no FLORA account required

***

## Tips

* **Stage before you capture** — frame the model, toggle the ground plane if you want a clean float, and let the pose settle before hitting Photo, Video, or Sheet
* **Use Sheet for consistency** — an 8-view turnaround gives downstream image and video models a consistent reference from every angle
* **Iterate with images first** — refine a look with an image model, then feed the result into an Image-to-3D model for better geometry
* **Pick multi-view models manually** — connecting multiple images doesn't switch modes for you; select the Multi-View variant yourself
* **Keep imports self-contained** — re-export from your 3D tool as GLB 2.0 with embedded textures if an import is rejected

***

## Limitations

| Limitation                   | Details                                                                                                                  |
| ---------------------------- | ------------------------------------------------------------------------------------------------------------------------ |
| Import format                | Only GLB (glTF Binary 2.0) is supported for import—other formats must be converted to GLB first                          |
| No workspace library sharing | 3D nodes can't be added to a shared workspace library folder; their source files keep project-level access controls      |
| Manual multi-view selection  | Multi-view models must be picked manually from the model picker—connecting 2+ images doesn't switch models automatically |
| Generation time              | 3D generation typically takes around 5 minutes—longer than most image or video generations                               |

***

## Common Use Cases

* **Product visualization** — generate or import a product model, then capture turntable sheets and hero shots for marketing
* **Character and asset turnarounds** — use Sheet captures as consistent multi-angle references for downstream image and video generation
* **AR-ready assets** — export to USDZ for AR viewers like iOS Quick Look
* **3D printing** — export to STL for printing pipelines
* **Concept-to-3D pipelines** — generate a look with an image model, then reconstruct it in 3D with Image-to-3D or Multi-View


---

# Agent Instructions
This documentation is published with GitBook. GitBook is the documentation platform designed so that both humans and AI agents can read, navigate, and reason over technical content effectively. Learn more at gitbook.com.

## Querying This Documentation
If you need additional information that is not directly available in this page, you can query the documentation dynamically by asking a question.

Perform an HTTP GET request on the current page URL with the `ask` query parameter, and the optional `goal` query parameter:

```
GET https://docs.flora.ai/nodes/3d-node.md?ask=<question>&goal=<endgoal>
```

`ask` is the immediate question: it should be specific, self-contained, and written in natural language.
`goal` is optional and describes the broader end goal you are ultimately trying to accomplish on behalf of the user. GitBook uses it to tailor the answer towards what is most useful for that goal.

The response will contain a direct answer to the question and relevant excerpts and sources from the documentation.

Use this mechanism when the answer is not explicitly present in the current page, you need clarification or additional context, or you want to retrieve related documentation sections.